Easy Halloween Nail Ideas: Cute Ghosts, Pumpkins and Pink Spooky Looks
Try five easy Halloween nail ideas using simple color combinations and decals, with a clear step-by-step method for a neat DIY manicure.
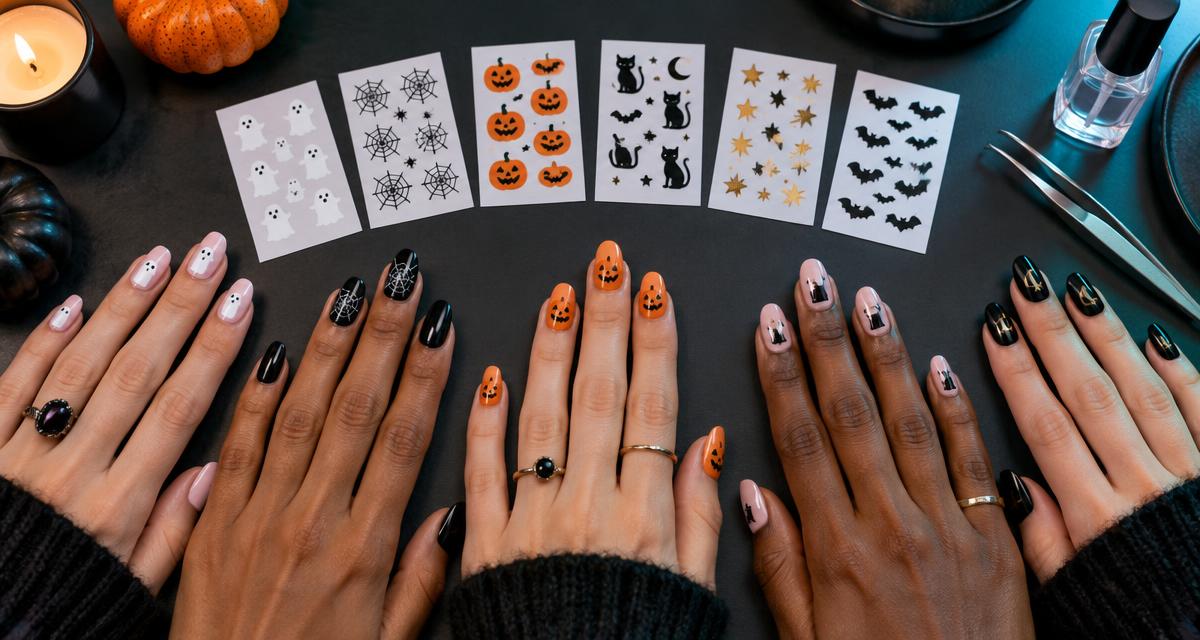
Halloween nails can feel seasonal without turning every nail into a complicated painting project. A clean base color, one repeated motif and a clear top coat are enough for a polished look. Decals make small ghosts, pumpkins and webs much easier to place consistently at home.
Key takeaways
- Choose one motif and repeat it on only a few accent nails.
- Let every polish layer dry before placing decals.
- Seal the edges carefully with a compatible clear top coat.
Prepare the nail before choosing the design
Start with clean, dry nails. Shape the edge, gently tidy the surface and remove oil or old polish. Apply your usual base coat according to its directions. Preparation matters because a decal cannot hide wet polish, dust or an uneven layer underneath.
Practical tip: If you use a new cosmetic product, review its ingredients and directions first, and stop if irritation occurs.
1. Soft pink nails with tiny white ghosts
Paint a soft pink or translucent base, then place a small white ghost on one or two nails per hand. Keep the other nails plain. The contrast is playful but still easy to wear throughout October.
2. Pumpkin orange accent nails
Use a neutral base on most nails and orange on one accent nail. Add a small pumpkin decal to the neutral nails or place a black motif over the orange. Repeating the same orange in only two places keeps the look connected.
3. Glossy black with one spiderweb
A black manicure becomes easier to read when only one nail carries a detailed web or spider decal. Place the design off-center so it follows the corner of the nail rather than trying to fill the whole surface.
4. A coordinated mix-and-match set
Pick three motifs from the same decal sheet—such as a ghost, pumpkin and bat—and repeat the same base color under all of them. The subjects can change while the color palette keeps the manicure cohesive.
- Thumb: plain base color.
- Index: small ghost.
- Middle: plain or glitter accent.
- Ring: pumpkin or web.
- Little finger: tiny bat or star.
5. Minimal Halloween accent nails
For the simplest version, paint every nail in a favorite everyday color and add one tiny motif to each ring finger. This takes less time, uses fewer decals and still gives the manicure a seasonal detail.
How to apply nail decals neatly
Paint the base color and let it dry completely. Lift one decal carefully with tweezers, place it without stretching and press from the center outward. Smooth any raised edge, then apply a clear top coat that is compatible with your polish and decals. Follow the directions supplied with both products.
- Plan the layout before removing a decal.
- Use a decal that fits fully within the nail edge.
- Avoid touching the adhesive more than necessary.
- Let the finished top coat dry before using your hands normally.
Quick answers
Frequently asked questions
Do I need special tools for Halloween nail decals?
Most designs need only your normal base polish, a clear top coat and optional tweezers for more precise placement. Follow the decal directions.
How do I stop nail decals from lifting?
Apply them to fully dry polish, smooth every edge and seal the entire nail with a compatible top coat.
Can I use Halloween decals on short nails?
Yes. Choose the smallest motifs, use one accent nail and leave visible space around the design so it does not feel crowded.
Put the guide into practice